Practical use of Unity3d engine.
Task #3: Objects selection and highlight in Unity3d
Contents
- Task #3: Objects selection and highlight in Unity3d.
- 1. Object selection
- 2. Object highlight
- Remarks
Task #3: Objects selection and highlight in Unity3d.
This article will show solution for the task: application should implement object selection by left mouse button down. Also application should highlight selected object. This article is base on the second one (http://denis-potapenko.blogspot.com/2013/03/task-2-rendering-hotspots-in-unity3d.html). So, I suggest reading the second article first. Figure B shows result we want to achieve:

Figure В. – Result scene
Object selection
At first, create class variable, which will store the selected object.
// selected GameObject
private GameObject mSelectedObject;
Also, let’s create property for this object.
////// Gets or sets selected GameObject /// public GameObject SelectedObject { get { return mSelectedObject; } set { ... // assign new game object mSelectedObject = value; ... } }
Full implementation of this property will be described below.
And now, create method, which implementation is object selection. We need to determine what object is located under the mouse. Object selection pipeline is:
- Convert mouse position from screen space to three-dimensional space (A);
- Build ray, directed from mouse position to “camera forward” way (B);
- Find intersection of ray and any object in the scene;
- Find the first object that occurred on intersection;
Convert mouse position to ray that spreads to “camera forward” (Combine A and B) using «ScreenPointToRay» method.
Ray ray = Camera.main.ScreenPointToRay(Input.mousePosition);
Now, let’s find ray intersection with any object in scene. To implement this call function «Physics.Raycast».
RaycastHit hit;
if (Physics.Raycast(ray, out hit, Constants.cMaxRayCastDistance))
I should notice, that each object we want to get intersection should have «Collider» component. Colliders mainly used in physics, particularly to determine object intersection. To assign «Collider» to GameObject you need to select the object in the scene and choose menu item «Component / Physics / Box Collider». In future articles we will have more detailed description of this component.
So, if intersection exist, function «Physics.Raycast» returns «true» and sets «hit» variable. Now, let’s determine intersected GameObject.
// get game object
GameObject rayCastedGO = hit.collider.gameObject;
And finally, set this object as selected.
// select object
this.SelectedObject = rayCastedGO;
And now, we need to call function “SelectObjectByMousePos” in «Update» one. But we will call it only when left mouse button is pressed.
// process object selection
if (Input.GetMouseButtonDown(0))
{
    SelectObjectByMousePos();
}
And now, let’s take a look to «SelectedObject» function implementation.
Object highlight
At first, I’ll tell a bit of theory. Object highlight we can do by a lot of ways. I will describe a way that we can achieve without any add-ons to Unity3d engine. But after that, I will describe you a better way of highlight implementation, but it will require doing some special actions.
So highlight implementation is divided to such parts:
- Create two materials: the first one is simple material, and the second material is used for highlight;
- Pass these materials to script;
- When object is selected set its material to highlighted;
- To object that was selected before, set simple material;
Now, let’s take a look to implementation. In Unity3d editor create folder with materials and name it «Materials». In this folder create two materials: simple “SimpleMat” and highlighted “HighlightedMat”. Result folder tree is shown on figure 2.1.

Figure 2.1 – Files and folders structure with created materials
I want to notice that “Diffuse” shader is set to both materials. Materials are configured identically, except that the material «HighlightedMat» has diffuse color set to red. Material settings of «HighlightedMat» are shown on figure 2.2.
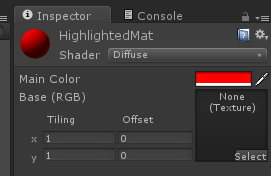
Figure 2.2 – Settings of «HighlightedMat» material
Now, create two public class variables in “AppRoot” class, which will contain materials data.
// materials for highlight
public Material SimpleMat;
public Material HighlightedMat;
Set value to this variables. We can do it directly in the editor. Process of assigning values to materials is shown on figure 2.3.
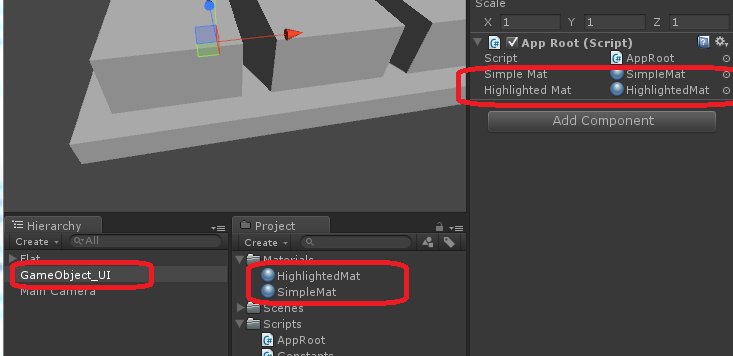
Figure 2.3 – Process of assigning materials to the script "AppRoot"
So, finally let’s have a look to implementation of the setter of the property “SelectedObject”.
Get «old» selected object.
// get old game object
GameObject goOld = mSelectedObject;
Set new selected object.
// assign new game object
mSelectedObject = value;
If selected object is not changed, just leave this function.
// if this object is the same - just not process this
if (goOld == mSelectedObject)
{
    return;
}
Set material to old selected object.
// set material to non-selected object
if (goOld != null)
{
    goOld.renderer.material = SimpleMat;
}
Set material to selected object.
// set material to selected object
if (mSelectedObject != null)
{
    mSelectedObject.renderer.material = HighlightedMat;
}
As a result, we have got a scene, in which user by means of left mouse button can select objects and that object will be highlighted to red color.
Remarks
As I mentioned, I don’t think that described above way is the best way to highlight the object. I consider that the more efficient and flexible way to highlight the object is to use shader with «Emissive» component. This component is multiplied to result color by special way, so the object gets only “coloring” of red color but not the full red color. You can do such shader yourself, and in further articles I will tell you how to do it. From existing set of Unity3d shaders I found one that can fit to highlight purpose in some situations. It’s named «Reflective/Diffuse». You can use this shader and its field “Reflection Color” instead of “Emissive”.
Results of development you can see here:
https://dl.dropbox.com/u/20023505/Articles/Unity3d/Lesson3/WebPlayer/WebPlayer.html
As always for free you can download source codes from here:
https://dl.dropbox.com/u/20023505/Articles/Unity3d/Lesson3/Sources/Sources.zip
https://github.com/den-potapenko/Unity3dArticles/tree/master/Lesson3
Denis, I have one more question. When I try to import this project's scene into another project of mine, I get the following error and I'm not sure why: NullReferenceException: Object reference not set to an instance of an object.
ReplyDeleteThe error happens on this line: (AppRoot.cs)
Delete// instantiate TransformObject and sets its rotate around object
mTransform = new TransformObject();
mTransform.SetTransformRotateAround(mGOFlat.transform);
and (TransformObject.cs)
Vector3 dir = mMoveObject.position - Camera.main.transform.position;
Hi, Lady_Eowyn!
DeleteFor using scene in another project you cannot just copy it, because in such a way the projects lost all references to scene objects, and this may cause such errors. You should create an empty prefab in your assets, then move all objects from the scene to this prefab, and then just press "Export package". Finally, import this package to another project.
If you still cannot understand how to export and import the packages, please let me know, i'll create the package for you, and give you a link.
Hi Denis,
ReplyDeleteThank you so much for your help! I got it up and running.
I love your tutorials and thank you so much for providing feedback and troubleshooting so quickly!
I'm going to learn how to manipulate the camera and hope it goes well.
Lady_Eowyn,
DeleteThanks :) Feel free to ask any questions!
Hey, I was wondering how would I be able to integrate a unity scene inside my web application and control my unity scene using javascript outside of unity and from my web app? It would be nice to see a basic tutorial on this subject.
ReplyDeleteHi, Lady_Eowyn!
DeleteVery interesting idea! But as far as i remember Unity3d is able to call javascript, not javascript calls Unity3d. But the idea is really interesting and i'll check the implementation of this issue. Thanks Lady_Eowyn for new idea, and let me check. I'll post a comment about my results.
hi can u please help me I cant import this project to my project
ReplyDeleteHi eliseo montefalcon,
DeleteWhat the problem?
hi denis I am making human body anatomy and I got your code to highlight the object .But the problem is I want to maintain the oirginal texture of the object after I click the object .can un help me?please....
DeleteYes, i think i can. Please give the sample of your project, i'll do it exactly in it
DeleteThis comment has been removed by the author.
ReplyDeleteare you bc?
ReplyDeletethanks for your help I already solve the problem
ReplyDelete