Practical use of Unity3d engine.
Task #4: Data transfer between applications in Unity3d
Contents
- Task #4: Data transfer between applications in Unity3d.
- Scene setup
- Data transfer between applications
- First application implementation (А)
- Second application implementation (B)
- Conclusion
Task #4: Data transfer between applications in Unity3d.
This article describes the task: implement data transfer between two Unity3d applications.
To implement data transfer we need to create two scenes in Unity3d. Each scene will represent separate application: A – sends data, B – receives data.
Scene setup
Create empty project. Create two folders: «Scenes» - for storing scenes and «Scripts» - for storing scripts. Create the first scene by pressing «File/Save Scene». Save file dialog will be opened. Choose «Scenes» folder and set «AppFirstScene» for the first scene file name. Now, choose menu item «File/Save Scene as» and set the scene file name as «AppSecondScene». The process of saving scene is shown on fig. 1.
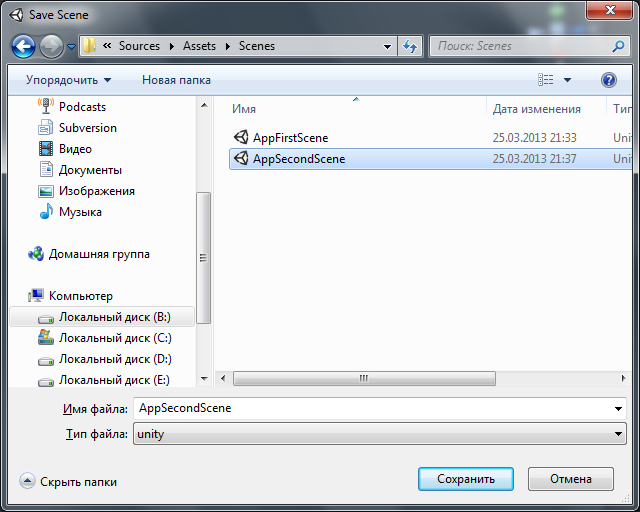
Figure 1. – The process of saving scene
Now set scene as active by double click on «AppFirstScene» scene. The camera is already presented in the scene. Let’s create an entry point for our scripts. Choose menu item «GameObject / Create Empty», and rename created GameObject to «AppRoot».
Similarly, choose «AppSecondScene» scene and create an entry point.
Result of created objects you can see at fig. 2.
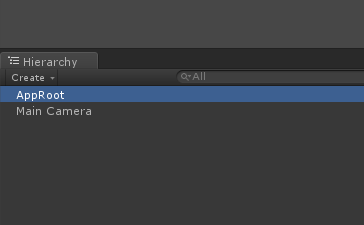
Figure 2. – GameObjects in «AppFirstScene» scene
Let’s start creating scripts. For each scene we will create scripts: «AppRootFirst» и «AppRootSecond». To do this press right mouse button on “Scripts” folder and choose «Create/C# script». Also, create Constants class. Created file system is shown on fig. 3.

Figure 3. – File system state
Now assign script «AppRootFirst» to «AppRoot» GameObject in «AppFirstScene» scene. To do this move script «AppRootFirst» to «AppRoot» by pressing left mouse button. So, now script «AppRootFirst» will be entry point in first scene «AppFirst». The process of assigning script «AppRootFirst» to «AppRoot» GameObject is shown on fig. 4.
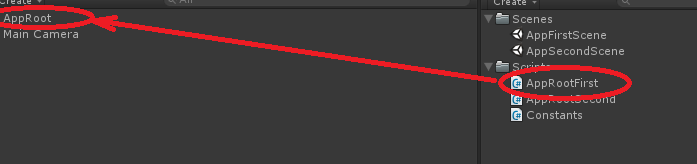
Figure 4. – Assign script to GameObject
We need to assign «NetworkView» component to work with network. To do this you should choose «AppRoot» and choose menu item «Component/Miscellaneous/Network View». Now, we can see properties of «AppRoot» in «Inspector» window by pressing left mouse button on «AppRoot» GameObject. Inspector window is shown on fig. 5.
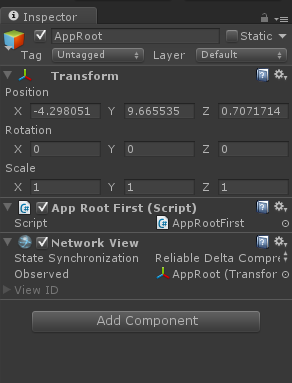
Figure 5. – «AppRoot» object state
And we should do the same thins in «AppSecondScene» scene. I will not repeat all actions, but here is the short list of main actions:
- Choose «AppSecondScene» scene by double click;
- Move «AppRootSecond» script to «AppRoot» object by left mouse button;
- Select «AppRoot» object and choose menu item «Component/Miscellaneous/Network View»;
- That’s all. Now all scenes are ready. Let’s start writing scripts.
Data transfer between applications
At first, I’ll tell some theory. There are a lot of ways to implement data transfer between applications, but in this article I will use one of the Unity3d native ways.
I will use «RPC» technology (read more here: http://en.wikipedia.org/wiki/Remote_procedure_call). The main idea is to call function in another application with required parameters. Unity3d already has implementation of RPC procedures (read more here: http://docs.unity3d.com/Documentation/Components/net-RPCDetails.html).
There are some peculiarities in this technology. I’ll tell about them in this article.
First application implementation (А)
Application will contain only two buttons and one text field. By pressing the first button application will send text message to the second one. By pressing the second button, application “A” will send data to application “B”. The main part of application is stored in «AppRootFirst» class. Take a look to its implementation.
Create three variables that will contain buttons and text field positions.
private readonly Rect cSendHelloRect = new Rect(20, 200, 200, 200);
private readonly Rect cSendDataRect = new Rect(240, 200, 200, 200);
private readonly Rect cDebugMsgRect = new Rect(20, 420, 200, 100);
Also create variables that will store debug message and passed data.
private string mSendMessage = "No messages";
private byte[] mDataToSend = new byte[] { 0x0b, 0x1f, 0x3c };
In «OnGUI» function output two buttons and one text field:
public void OnGUI()
{
    …
    if (GUI.Button(cSendHelloRect, "Hello"))
    {
    …
    }

    if (GUI.Button(cSendDataRect, "Send data"))
    {
    …
    }
    GUI.Label(cDebugMsgRect, mSendMessage);
}
Now, implement sending message and data by means of RPC functions. To pass messages by means of RPC functions one of the applications should start a server and the other one should be connected to a server as client. As far as the first application is the server, create «InitNet» function to initialize it. This function is very simple, but in future we can add an additional code, for server initialization. Unity3d has static function «Network.InitializeServer» to run a server. The first argument is number of connections. In this application we will set this value to 3. The second argument is the connection port. Variable that store connection port is located in Constants class.
private void InitNet()
{
    Network.InitializeServer(3, Constants.cServerPort, false);
}
Call «InitNet» function in «Start» function.
public void Start()
{
    InitNet();
}
To run RPC function we need to call «NetworkView.RPC» function. This component we already added to «AppRoot» object during scene setup. One of the RPC peculiarities is that each RPC function should have «[RPC]» attribute. Also I should mention that this function should be implemented both in class that calls function and class in which function should be called. This is very important, otherwise RPC procedures will not work.Sending messages also has its own peculiarities. If send messages on each frame, sending messages interrupts. So, some delay should be implemented before next message send.
To implement delay for messages create variables, that will store current delay time and maximum delay time.
// timer to create some delay for sending messages
private float mWaitTimeUpdateLaserTracker = 0.0f;
private const float cMaxWaitTimeUpdateLaserTracker = 0.1f;
And now «OnGUI» function will have such view.
// increment wait time
if (mWaitTimeUpdate < cMaxWaitTimeUpdate)
{
    mWaitTimeUpdate += Time.deltaTime;
}

if (GUI.Button(cSendHelloRect, "Hello"))
{
    if (mWaitTimeUpdate > cMaxWaitTimeUpdate)
    {

    //
    this.networkView.RPC(Constants.cRPCSendMessage, Constants.cSendMessagesMode, "Hello");

    //
    mWaitTimeUpdate = 0.0f;

    //
    mSendMessage = "'Hello' message sent";
    }
}
if (GUI.Button(cSendDataRect, "Send data"))
{
    if (mWaitTimeUpdate > cMaxWaitTimeUpdate)
    {
        //
        this.networkView.RPC(Constants.cRPCSendData, Constants.cSendMessagesMode, mDataToSend);
        //
        mWaitTimeUpdate = 0.0f;
        //
        mSendMessage = "Data sent";
    }
}
GUI.Label(cDebugMsgRect, mSendMessage);
I want to notice that it’s very comfortable to store names of RPC functions in Constants class, because RPC function names may be used in several classes.
In this class we will create empty RPC functions.
[RPC]
public void RPCSendMessage(string msg)
{

}

[RPC]
public void RPCSendData(byte[] data)
{

}
This is the end of development of the first application (A). To build it, press menu item «File/Build Settings». In the settings, in «ProductName» field set «AppFirst», and add «AppFirstScene» scene to scenes list. Press «Build» button.
Now, take a look to second application (B) implementation.
Second application implementation (B)
Create variable that will store received message.
// received message
private string mReceiveMessage = "No messages";
Create variable that will store text field position.
// rect for displaying of received message
private readonly Rect cMsgRect = new Rect(20, 420, 200, 100);
And now «OnGUI» function will have such implementation.
public void OnGUI()
{
    GUI.Label(cMsgRect, mReceiveMessage);
}
To implement connection with server Unity3d has static function «Network.Connect». As server is located on local computer, server IP is «127.0.0.1». Connection port is the same for server and for client.
//
Network.Connect(Constants.cServerIp, Constants.cServerPort);
Now, create RPC functions implementation.
[RPC]
public void RPCSendMessage(string msg)
{
mReceiveMessage = "Message received = " + msg;
}

[RPC]
public void RPCSendData(byte[] data)
{
    mReceiveMessage = "Data received. Data length = " + data.Length;
}
That’s all. To build the second application, choose menu item «File/Build Settings». In the setting, in «ProductName» field set «AppFirst», and add scene «AppSecondScene» to scenes list. And press «Build» button.
Conclusion
As you can see, data transfer implementation is very simple. You should to know a few main rules and you can start.
Results of development you can download here:
https://dl.dropbox.com/u/20023505/Articles/Unity3d/Lesson4/Builds/Builds.zip
As always for free you can download source codes from here:
https://dl.dropbox.com/u/20023505/Articles/Unity3d/Lesson4/Sources/Sources.zip https://github.com/den-potapenko/Unity3dArticles/tree/master/Lesson4
No comments:
Post a Comment